SVG viewbox, make stretchable graphics

Get the source at Github

I struggled with SVG, creating an early protoype of a mobile webapp. I wanted to create an interesting background for the webapp. It needs to be resolution independent and scalable without quality loss, SVG seems the best choice because of the vectors.

My initial thought was to make a 9-slice attempt for SVG. However since the app should be used with a phone in portrait orientation and I felt that repeating parts of the background would not be sufficient for final app. Therefore stretching should be full isze and strechable.

Steps

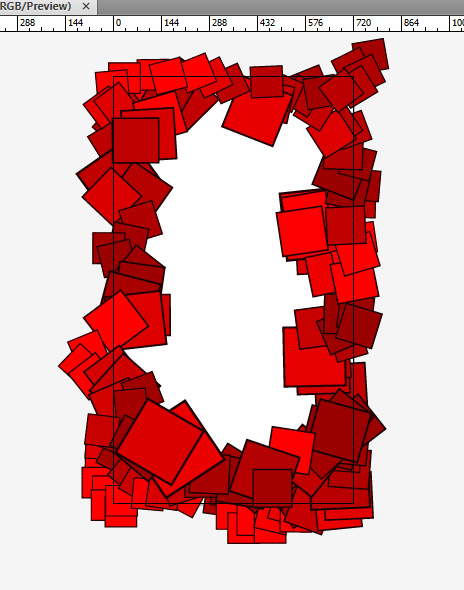
First I created an illustrator file with the symbol sprayer to create a framelike graphic, I exported it as svg with the default setting with “Save for web”. You can see the example below.

Background in illustrator for SVG export

Secondly make sure the svg element has the folowing style:

	position: absolute;
	width: 100%;
	height: 100%;

The trick is to make sure that the width and height of the input SVG in pixels matches the width and height of the viewbox, and that the start corner matches you desired result. Viewing the examples makes it more clear.

Examples

example : desired results

SVG properties

As you can see Illustrator defaults the viewbox as desired. Is moves the mask (viewbox) to the position 166.646, 114.09 of the dimension of the available vector art in the drawing.

	 x="0px" 
	 y="0px" 
	 width="100%" 
	 height="100%" 
	 viewBox="166.646 114.09 720 1280"
	 preserveAspectRatio="none"
	 meetOrSlice="slice"

example : undesired result now it shows all the artwork

SVG properties

In this example the viewbox contains all the available vectors in the illustrator file.

	 x="0px" 
	 y="0px" 
	 width="100%" 
	 height="100%" 
	 viewBox="0 0 994 1517"
	 preserveAspectRatio="none"
	 meetOrSlice="slice"

Code

The examples and the illustrator file can be downloaded from Github


Audio visualisation with WebGL and webkitAudioContext

Get the source at Github

For a while I wanted to experiment with audio visualisation in the browser, with the new functionality in Chrome. My graduation project concerned the other way around, namely the sonification of the dom of any webpage. To create this demo I mainly used, some html5rocks info

Example

Check the “chrome only” demo

WebGl audio visualisation

Parts explained

The workhorse of the visualisation is the “webkitAudioContext” currently available in Chrome. With the webkitAudioContext it is possible to create an audio analysis. The following snippet is the setup for the analysis .

     // create the analyser
     var context = new webkitAudioContext();
     var analyser = context.createAnalyser();

    //initialize
    function onLoad(e) {
                startThreeJs();
                var source = context.createMediaElementSource(audio);
                source.connect(analyser);
                analyser.connect(context.destination);
                rafCallback();
     }
     window.addEventListener('load', onLoad, false);

The rafCallback function is where the visualisation happens, the data of the audio is stored in an bytearray every available frame. For this visualisation I only used 15 ‘frequency’ bars to keep the animation smooth, for real purposes you should use the whole spectrum.

     // bind the audio data to the web gl cubes
     function rafCallback(time) {
                window.requestAnimationFrame(rafCallback);

                var freqByteData = new Uint8Array(analyser.frequencyBinCount);
                analyser.getByteFrequencyData(freqByteData);

                for (var j = 0; j < MAX_BAR; j++) {
                    var magnitude = freqByteData[j];
                    var delta = magnitude / 100;
                    cubes[j].position.y = cubesPos[j] + delta * 0.25;
                    cubes[j].scale.y = delta;
                    // categorize color on amplitude
                    var color =  0xf5a711;                
                    if( delta > 0 && delta < 1 ){
                       color = 0xf5a711;
                    }else if( delta > 1 && delta < 2 ){
                        color = 0xf55c11;
                    }else{
                        color = 0xcd0505;
                    }
                    cubes[j].material.color.setHex( color );
                }
      }

Feel free to use and abuse the source