Lessons learned modernizing Frontend
tldr; Strategy taken on rebuilding our main website
The past years few year we gradually began to change out main application from a gigantic jQuery monolithic structure to a more modular and service oriented application. The current application was not bad, it did share code with our other sites by composer and separation of code was in place. But we wanted es6 and more modularity and also to remove the dependency of jQuery in the future. In this document I will discuss the strategy we have taken and the hurdles we had to overcome.
Since we could replace the whole site we needed to have a gradual approach, which settled on the final strategy:
1 – keep the LAMP stack for the SEO important parts of the site, might one day migrate to a SSR react solution if the services in the backend are ready
2- migrate the JavaScript needed for the LAMP stack frontend from JQuery and Composer to ES6 and NPM/Webppack
3- Replace the dynamic parts of the site, filters, search results, price grids etc with React.
4- Keep everything in the Frontend in sync with a global frontend application state with the help of Redux, this state should only store information needed for the business logic. This step really made it possible to slowly migrate to a newer stack in the frontend.
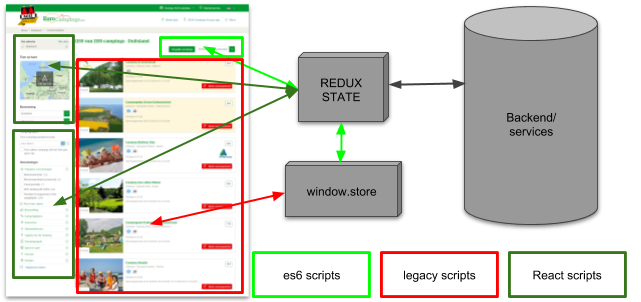
5- create a event dispatcher which uses native javaScript to replace the jQuery event system. On difficulty we had was to replace The Jquery Ajax Complete event, Mostly in IE11
build sytem
The build system we previously had was heavily dependent on Assetic by symfony and composer. We replaced this with NPM and Webpack. In webpack we created 3 main build roads for the JavaScript
1- legacy code: we import the legacy scripts with ‘script-loader’, the best way would be to rewrite all to es6 modules, unfortunately we have literally hundreds and hundreds of legacy files tightly connected to jQuery.
2- modern js: es6 code new code is written here en sometimes legacy code is migrated to this section, shared code is moved to a jest unit tested repo, shared with npm instead of composer vendor module
3- react: we decided to make the dynamic parts (filtering and result listings) of out website with react
Styling
Our website was based on compass, which provided us with a lot of magic, but also a lot of breaking code when we tried to remove the dependency on Compass
First step we replace all the styling which depended on Ruby functions of Compass and we include all the uses scss compass mixins our self.
Second step was to remove file per file the dependency on the Compass mixins this also took some time
Replacing jQuery modules
we had lots and lots of jQuery modules, which sometimes caused problems and fixing sometimes was hard because of the size of some of the modules. For the future we decided to replace all the modules ourselves. In the end a basic Modal, Slider eg. are actually very simple. Currently out newly written modules are living in a separate repo, the modules only change css classes and styling is not available. Styling is the responsibility of the site which is implementing the module.
testing
Testing was also added to the stack, we used some testing in the past with Jasmine, since Jest looks a lot like Jasmine and has a lot of momentum we made sure that the new shared repos we tested with Jest. Jest proved a really nice experience. We use it for React as well as for regular es6 modules. A lot of things worked seamlessly even integrating locale and formatting libraries.
Prevent regression brought us to cypress.io a brilliant suite. The one drawback of cypress is that it only works with chrome, but luckily the functional changes and features between browser do not differ as much as they did in the past. The advantages however are enormous, in half a day I had several integration tests running on my machine. And one day later we had cypress integrated in Jenkins. Cypress also helps with keeping the tests clean by checking and testing on the fly. Elements not found result in an test error for example.
Lessons learned
Always stick as close as you can to the W3C standards, to future proof you site. Be hesitant to use plugins and pick them wisely, for sliders for example we chose the excellent Siema slider (https://github.com/pawelgrzybek/siema) which is a perfect es6 minimal slider which makes it easy to build complex sliders with. like the example below.
Another standard is NPM this is the starting point for our front-end scripts, and it will be even when the new Webpack arives. Composer also hooks into npm scripts to have a single update command.
Also make sure you create a system for “Single source of truth”. This really helps with keeping things clear,and keeping the decreasing “old” in sync with the increasing “new”. We picked redux for this, but there are several options.
When you choose (or are forced) to slowly migrate legacy to modern frontend, then it is no shame to use some global variables. As long as you can remove it when the full migration has been fulfilled. For example we use globals for: the state, the event systems and the error logging.